To access your account via the API you'll need to create an API Key and API Secret Key for authentication.
Admin Users
To obtain an API Key and API Secret Key administrative users can go to Security > API Access in the Enterprise Theme and click Create an API Key.
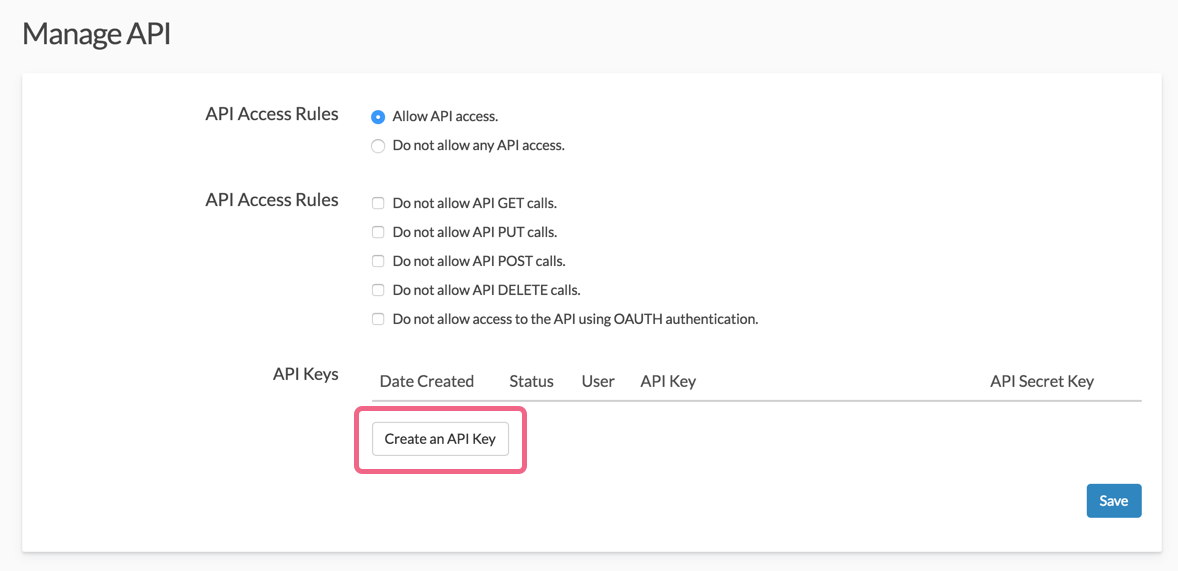
As API Keys are generated per user you will need to select the user for which you wish to generate keys. Make sure to generate keys per each user that accesses the API.
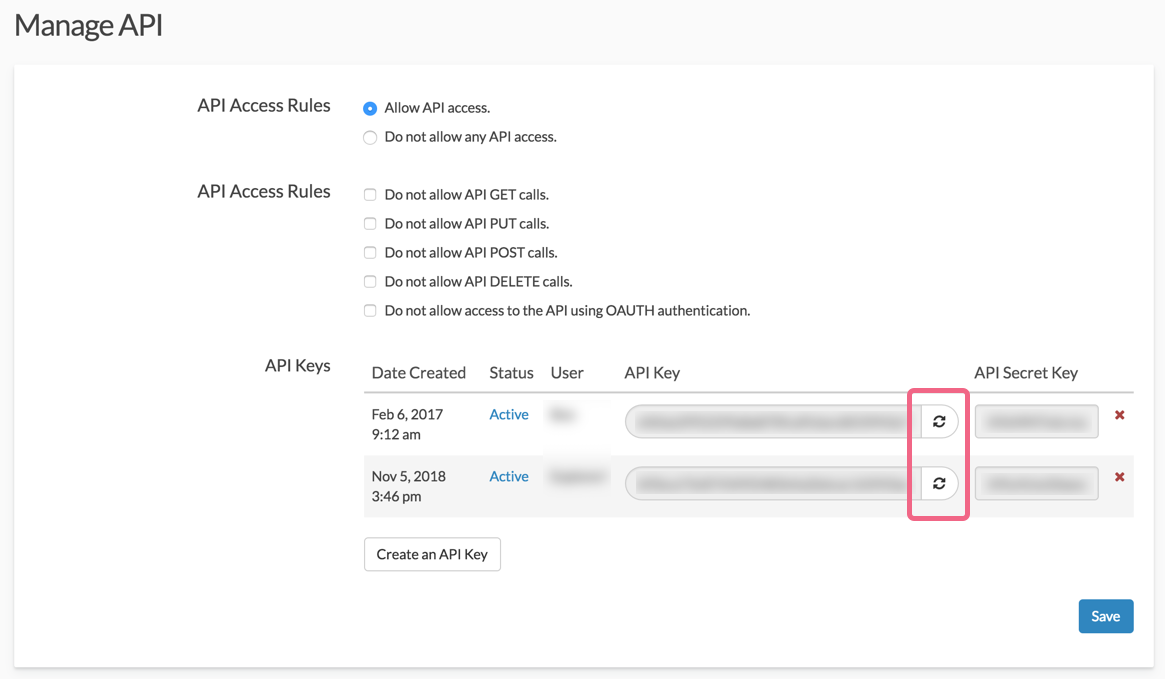
All API Keys for all users will then display on the API Settings page. If at any time you suspect that a user's API Key has been compromised, you can click the Regenerate API key button to create a new key.
What Happens if a User Tries to Authenticate with an Old Key?
If you create a new key for a user that has an existing key, their old API key is deleted and will no longer work. Here is the return you will get:
"result_ok": false,
"code": 401,
"message": "Login failed / Invalid auth token"
If you are simply creating a key for a new user this will not affect any of the other keys set up in your account.
Non-Admin Users
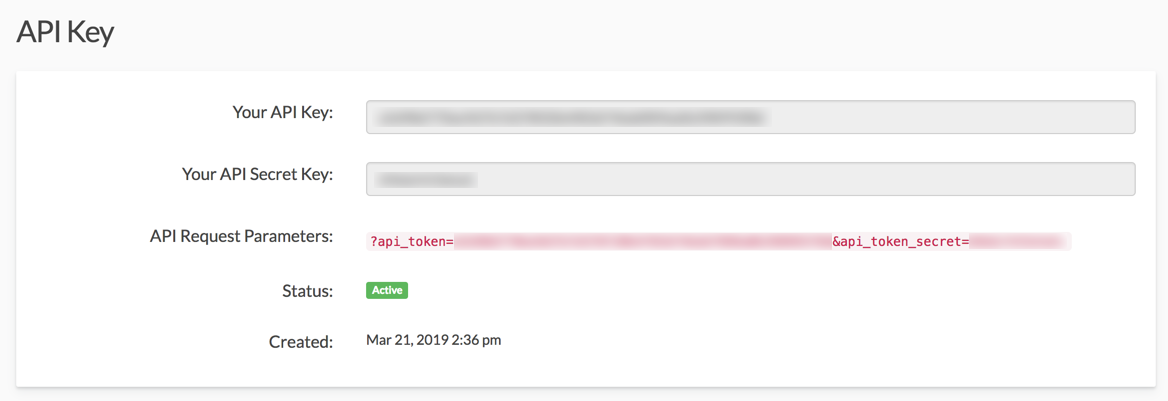
For non-admin users once your account administrator has generated a API Key for you this will be available under Account > Integrations > API Key. If you do not have an API Key here, contact your account administrator to generate one.
Making Calls with Your API Key
Here is an example call using an API key:
https://restapi.surveygizmo.com/v4/survey?api_token=E4F796932C2743FEBF150B421BE15EB9&api_token_secret=A9fGMkJ5pJF1k
Invalid api_token or api_token_secret
If you supply and invalid api_token or api_token_secret, you will see the following error message:
Invalid api_token or api_token_secret supplied
OAuth
To authenticate using OAuth, you'll want to first register your plug-in/application. Each plug-in application you register will be provisioned a consumer key and secret. This key and secret scheme are similar to the public and private keys used in protocols such as ssh for those who are familiar. This key and secret will be used, in conjunction with an OAuth library in your programming language of choice, to sign every request you make to the API. It is through this signing process that we trust that the traffic that identifies itself is you is, in fact, you.
Registering Your Application
Registering your application is simple. Simply log into your SurveyGizmo account and fill out the OAuth Application Registration form. To get to the OAuth Application Registration form go to the below URL:
US Customers use:
https://app.surveygizmo.com/account/restful-register
EU Customers use:
https://app.surveygizmo.eu/account/restful-register
Canada Customers use:
https://appca.surveygizmo.com/account/restful-register
Finding a client library for OAuth
Oauth.net maintains a list of libraries for virtually every programming language: http://oauth.net/code/
Understanding the OAuth Process
When installing or activating your SurveyGizmo Plug-in, the user should be presented a "Connect to my SurveyGizmo account" link in your application. This will seem like quite a bit of work, but it's actually quite straight forward from the user's perspective.
Step 1. Get a Request Token from SurveyGizmo
Request an oauth token from SurveyGizmo's "get_token_request" URL:
US Customers use:
http://restapi.surveygizmo.com/head/oauth/request_token
EU Customers use:
http://restapi.surveygizmo.eu/head/oauth/request_token
Canada Customers use:
http://restapica.surveygizmo.com/head/oauth/request_token
You'll need to pass over a few parameters with this call outlined below. Your OAuth library will actually take care of most of this. The parameters you will have to provide to your library are: The SurveyGizmo URL, Your Callback URL, Your Consumer Key, Your Consumer Secret. The last two are obtained when registering your application. Pretty easy!
All Parameters for this call:
| Request Parameter | Description |
|---|---|
| oauth_consumer_key | Consumer Key provided to you when you signed up. |
| oauth_nonce | A random string (OAuth Core 1.0 Spec, Section 8) |
| oauth_signature_method | The signature method that you use to sign the request. This can be PLAINTEXT or HMAC-SHA1. |
| oauth_signature | The Consumer Secret that was issued to the application. If you are using the PLAINTEXT signature method, add %26 at the end of the Consumer Secret. |
| oauth_timestamp | Current timestamp of the request. This value must be +-600 seconds of the current time. |
| oauth_version | OAuth version (1.0). |
| xoauth_lang_pref | (optional) The language preference of the User; the default value is EN-US. |
| oauth_callback | SurveyGizmo redirects Users to this URL after they authorize access to their private data. |
This POST/GET call to our server will return a Request Token to your application. It's not an "Access Token" yet... that is the point of the next steps:
Step 2. Authorize Access
Now redirect the user in a pop-up or full window to the SurveyGizmo Authorize page:
US customers use:
http://restapi.surveygizmo.com/head/oauth/authenticate?oauth_token=[request token returned from step 1]
EU customers use:
http://restapi.surveygizmo.eu/head/oauth/authenticate?oauth_token=[request token returned from step 1]
Canada customers use:
http://restapica.surveygizmo.com/head/oauth/authenticate?oauth_token=[request token returned from step 1]
This page will ask the user to authenticate the request and give access to API data based on the user who authenticates.
If you wish to customize this page with the name of your application you may pass additional parameters such as: custom_pluginname=Your+App+Name.
Note: You'll note that your redirection URL is not part of this second step. That's a security measure in OAuth - it was provided in the original request for a token, so don't panic!
Step 3. Get an Access Token
Once the user authenticates access to his or her data, they will be redirected back to the callback URL you provided during the initial request. You will then get back a parameter called oauth_verifier. This and your request token can now be traded for an Access Token which will be used for all future calls to the API. To get the access token you must pass the oauth_token and oauth_verifier returned by the previous endpoint (typically handled by your OAuth Library) to the following end point.
http://restapi.surveygizmo.com/head/oauth/access_token
The access token will include the oauth_token and oauth_token_secret. You should store these in your database and use them to sign future calls.
Step 4. Make an API Call
In order to authenticate with OAuth, you need to add all of the following variables to your API call. As you can see, there are quite a few! You can do it yourself or use a library that automatically generates the oauth_signature method, oauth_timestamp, oauth_version, and oauth_nonce.
| Request Parameter | Description |
|---|---|
| oauth_consumer_key | Consumer Key provided to you when you signed up. |
| oauth_signature_method | The signature method that you use to sign the request. This can be PLAINTEXT or HMAC-SHA1. |
| oauth_nonce | A random string (OAuth Core 1.0 Spec, Section 8) |
| oauth_signature | The concatenated Consumer Secret and OAuthToken Secret separated by an "&" character. If you are using the PLAINTEXT signature method, add %26 at the end of the Consumer Secret. If using HMAC-SHA1, refer to OAuth Core 1.0 Spec, Section 9.2. |
| oauth_timestamp | Current timestamp of the request. This value must be +-600 seconds of the current time. |
| oauth_version | OAuth version (1.0). |
| oauth_token | Provided by the call to access_token. |